
Blocking Your Animation - Phases of Animation, Part 2
- Animation Archive
- Nov 25, 2018
- 7 min read

Blocking is the stage when all of the character's motion is designed, so it is very important to understand how to effectively communicate their weight, acting, and the principles of animation in your blocking.
This is a continuation of my four part series on the phases of animation, listed below. Today, we'll be talking about blocking!
Planning
Blocking
Splining
Polishing
Blocking, in a nutshell, is the way that animators get the core motion and acting into their scenes, using poses. Animators start out with just a simple character in a t-pose, and in order to bring them to life, we have to create all of that motion ourselves. By putting animation keyframes on the character's controls, we can tell the computer what we want this motion to look like. This can be a very daunting process, since we're starting from nothing, but the tips below will help break down how we can translate our reference into a 3D animation.
Types of Poses
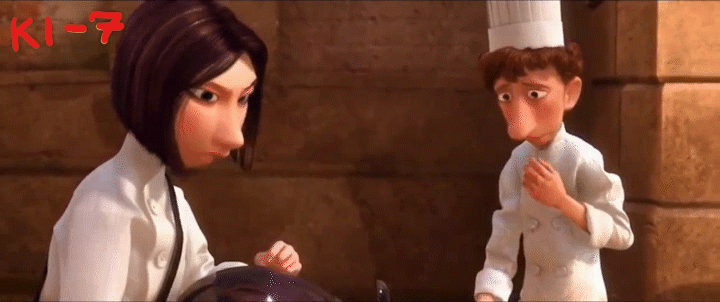
There are four different kinds of poses you will hear about in animation: storytelling poses, key poses, breakdowns, and inbetweens. Each of these adds an increasing level of detail to the animation, and you need all of them to create a successful animation. We'll be looking at the clip below from Ratatouille to see how this works in action, focusing specifically on Linguini's performance.

Colette: You have talent.
Linguini: No, but I don't! Really! It's not me!
First Pass Blocking
The first pass of blocking is when you begin to define the story and motion within your animation. It doesn't have all the detail, but the actions of the character should be clear to the audience.
Storytelling Poses
These poses would be considered the minimum amount of poses necessary to tell the story of your animation. This can be subjective, but I like to think of these poses as my animation "storyboard". In a storyboard, the character's actions are described by only several frames because these are the only actions that are NEEDED to explain the story. For a short animation, you may only have 5 of these storytelling poses. For a long one, it could be 15 poses. But these are only a small fraction of the final number of poses you will have in your scene.
Below, I've picked out what I consider to be the storytelling poses from the Ratatouille clip. To understand the storytelling poses, we have to understand what the shot is trying to convey. To me, the story of this clip is that Linguini is contemplating Colette's words and then decides he has to convince her that she has nothing to worry about. So I chose the poses that I thought conveyed Linguini's thought processes and emotional changes the best. His first pose is worried and contemplating. The second is beseeching and vulnerable, since he wants Colette to not feel threatened by him. And the third conveys his desperation that she understand him.

Key Poses
Key poses are similar to storytelling poses, but instead of describing the story, they describe the action. These are all of the poses that you need to explain the character's motion. Typically you can pick out a character's key poses by finding the changes in direction. In other words, you're trying to find the "extremes" of a character's motion. Some things to look for might be a change in head direction, the point where a character starts to lift their foot off the ground, or a change in direction in the character's hips. You will have significantly more key poses than storytelling poses. In the case of this clip, I had key poses about every 10 frames or so.
I've again picked out some of these poses for you from the Ratatouille clip. I always pick out the pose on frame 1, and in this case, that pose is "held" for 7 frames. The next pose that he hits is on frame 19. I chose this because his body is compressing here, and on the frame after, his body and hands are changing directions and moving upwards. The next hit is on 29 where the body stops moving upward and moves down into the pose on 38. At 49, his body has come upward and his head has rotated toward screen left. On the next frame, his head and body will start to move in the opposite direction. The same sort of thing happens on 57. Next, I chose frame 69 as a key because his body has just come up and is about to change directions and his hands also just hit a pose on his chest that I want to capture in my keys. Last is 76, because again his body has hit a pose and finished its motion forward.


Blocking Plus
This is the final phase of blocking, in which you add all of the remaining detail to the motion. All of the arcs, overlap, weight, etc should be completely fleshed out, and you should have keyframes at least every 4 frames, except during moving holds.
Breakdowns
Breakdowns are one of the most important parts of blocking, and I have a detailed blog post here describing them in detail. But as a brief overview, breakdowns are used to describe the motion further between your key poses using overlap, lead & follow, and other principles. You might have 1, 2, or even 3 breakdowns between your key poses, but by the time you're done with your breakdowns, you should have keyframes at least every four frames, except during moving holds or very slow motions. (If you have a very detailed motion, you may even have keys every 2 frames.)
Here are the breakdowns I picked from the Ratatouille clip. I'll specifically explain the section between the key poses at 57 and 69. I'm again trying to find changes in direction and important details that I want to keep in my animation. All of these breakdowns help Linguini to get from key pose 57 to 69 in an interesting and varied way.
Frame 60 felt important to me because the hands are reaching an extreme up position, which creates part of the arc as they move in toward his body. I also noticed that his head doesn't start to rotate much until after this frame, so it's important to capture that movement lagging behind the rest of his body.
Next, I chose 63 because his head is about to change direction, so you want to get that head shake in your breakdowns. Also notice that the screen left hand catches up to the other one on this frame, creating some variety in their spacing. His spine has also pretty much finished its motion by this frame.
At 65, there's another breakdown because his hands have finished coming in toward his body and are about to change direction. His head also hits his next extreme pose.

Inbetweens
These provide the final level of detail in your animation, and this is the one piece of information that we allow the computer to animate for us. (However, in 2D animation, the inbetweens are hand animated by an "inbetweener".) The inbetweens include all of the remaining frames that lie between your breakdowns, key poses, and storytelling poses. However, I usually don't have these frames in my animation until the splining phase, since that's when I switch out of stepped tangents, so we'll continue further with this topic in the next post!
Putting it Together
All of these poses together complete your blocking pass, and each can be found by scrubbing through your video reference. It is not cheating to take these directly from the reference! However, don't forget to exaggerate what you see in your reference. You can take a look at my Posing a Character post to find out how to do this.
Throughout the process, also make sure to use the < > keys to flip between your poses in Maya and make sure they're all working together. I find this method really helpful because it's similar to the way 2D animators flip through their drawings, and it eliminates the distraction of the inbetweens that Maya automatically creates for you.
Important Blocking Tips
Here are some important things to keep in mind when blocking in your scene:
Pose to the Camera
The camera view is the view that your audience will see your animation from, so all of your poses and silhouettes need to be clear from this angle. This is why you need to have your camera set up and locked into position before you start animating. However, it's also important to check your poses within the perspective view as well to make sure their weight is correct from all angles. Don't be tempted to cheat this, just because you won't be able to see it from the camera. Especially if you're a beginning animator, your body mechanics will be much more solid if you pose the entire body, and it also makes a big difference during the lighting process if you cheat something too much. (A shadow of a broken leg on the floor will be very noticeable, even if that leg isn't visible in the camera.)
Keep Animation Principles in Mind
Don't forget your animation principles! In order to have solid blocking, you need to keep in mind the character's weight and the way you use the 12 principles from the beginning. Use your keyframes to make sure the character's limbs are moving in clean arcs (from the camera view). Make sure the character is anticipating their motions properly. Create the most appealing poses as possible. Keeping all of this in mind will ensure that you have good mechanics in your blocking pass and are ready to move into splining at the end.
Key EVERYTHING
This is something I didn't know when I first started animating, but every single storytelling poses, key pose, and breakdown needs to be keyed on the same frame on every single control that your character has. This might seem excessive, but the purpose of this is to make sure that your animation software keeps all of the beautiful poses you've created, rather than interpolating pieces of your animation. Also, by keying everything on the same frames during your blocking pass, it will keep your animation much cleaner in case you need to make timing or pose changes. (This also happens to be the stage in which you'll get the most major changes from your director, so you need to be able to easily cut out and add detail.)
Don't Let the Computer Animate for You
When I began animating, I assumed that because the computer could interpolate between keys, we were supposed to rely on it to complete the motions for you. However, the exact opposite is true. The computer does NOT know how to animate because all of its inbetweens are mathematically computed between each key, so it will always create even and boring motion. This is why we need to add so many keys to our animations. We need to make sure the computer knows exactly how we want our character to move, and we only leave the smaller details for it to fill in.
These are all the tools you need to get started blocking in your scenes! We'll continue on with the splining phase in my next post.


I love your page! Such a pity that you don't have much views, maybe try to publish some post on animation groups? You deserve more views! :D Also in order to place a comment it's obligatory to create a new account here.